
Hot Dishes
Homemade Salted Soybean Paste
timer
10 MIN
signal_cellular_alt
Medium
person
4 servings
About This Recipe
This savory salty soy milk recipe is a delicious twist on traditional Chinese breakfast, combining rich flavors and textures for a satisfying meal. Creamy homemade soy milk is quickly coagulated with vinegar and light soy sauce, creating a silky base. Crispy fried dough adds a delightful crunch, while tangy pickled vegetables, fresh scallions, and umami-packed seaweed enhance the dish with layers of flavor. A drizzle of aromatic sesame oil ties everything together for a comforting and nutritious bowl. Perfect for those who love bold, savory breakfasts, this recipe transforms simple ingredients into a hearty dish that’s both easy to make and full of authentic taste. Enjoy the contrast of smooth soy milk, crunchy toppings, and zesty seasonings in every bite!
Instructions
Detailed preparation guide
servings
4
Total Time
10m
shopping_basket Ingredients
Main Ingredients
- soybeans 200g (pre-soaked)
- fried dough 50g
The aromatics
- pickled vegetable 30g
- scallions 30g
- seaweed 20g
The sauce & seasonings
- vinegar 1 tbsp
- light soy sauce 1 tbsp
- sesame oil 1 tsp
menu_book Directions
1
Step 1
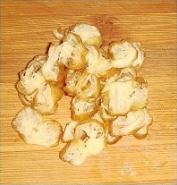
Cut half of the fried dough into small pieces and set aside. Finely chop the pickled vegetable and scallions. Tear the seaweed into smaller pieces by hand.
2
Step 2
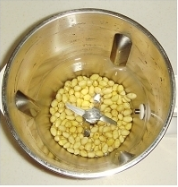
Put the pre-soaked soybeans into a food processor and blend into a thick soy milk.
3
Step 3
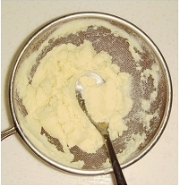
Filter the soy milk through a strainer to remove the soybean dregs (the dregs can be mixed with seasonings to make vegetarian meat floss).
4
Step 4
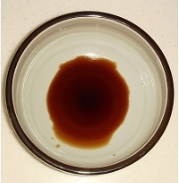
Pour a small amount of vinegar and light soy sauce into a small bowl.
5

Step 5
Quickly pour the filtered hot soy milk into the bowl, and the soy milk will immediately coagulate.
6

Step 6
Add the seaweed, scallion fragments, pickled vegetable, and fried dough, then drizzle with a small amount of sesame oil to make delicious salty soy milk.
Community Reflections
0.0
(0 reviews)
Please login to write a review
Write a Review
No reviews yet. Be the first to review this recipe!